
Many hobby gardeners are not yet familiar with the Tayberry. You can find out here how the berry can find its way into your garden.

The tayberry (Rubus fruticosus x idaeus) is a young hybrid of raspberry (Rubus idaeus ) and blackberry (Rubus fructicosus). The Tayberry was cultivated in Scotland in the 1960s and owes its name to the longest river in the country, the Tay. But not only in the north of Great Britain, but also in German gardens, the tayberry feels at home. The taste is reminiscent of raspberries, but is a bit more sour. It is very easy to care for and gives you the opportunity to grow a type of fruit that you cannot easily find in the ordinary supermarket. We'll tell you everything you need to know about the tayberry in your garden: from the best varieties and purchase, to cultivation and care, to harvesting and processing.
Tayberry varieties: The best varieties at a glance
When choosing the type of tayberry, two factors play a major role: easier handling without thorns and, of course, the taste. Here are the two most well-known tayberry varieties:
Tayberry ,Medana‘: The tayberry classic; the tendrils have fine spikes, similar to those of the raspberry. The fruits are sweet and sour in taste and very aromatic. 'Medana' tayberries are very productive and produce large fruits up to 4 cm long.
Tayberry ,Buckingham': A new variety; thornless and thus easier to care for and harvest. 'Buckingham' tayberries are crimson and cone-shaped. Their taste is more reminiscent of blackberries.
Buy Tayberry
If you decide to buy one or more tayberry plants for your garden, you should consider which variety is best for you. Tayberry plants can be purchased at any major garden center. When buying, however, always pay attention to the he alth of the plant. Check the plant for diseases or pests before you buy itavoid disappointment.
Plant Tayberry
Tayberries are very easy to care for and can grow almost anywhere. In order to achieve optimal yields, it is still advisable to consider a few points. We'll tell you the best location, the right substrate and give you step-by-step instructions for planting the tayberry as well as tips for planting in a trellis.

The ideal location
In order to provide the Tayberry with the best conditions, it should be planted in a location that is as sunny as possible. Although the berry can also develop in partial shade, the yield will be noticeably lower. In addition, the tayberry is sensitive to drafts. A wind-protected location is therefore advisable. It is also important to note that tayberries can grow up to 2.5 meters in height. You should therefore give them enough space.
The right substrate
The tayberry does not make any great demands on the substrate either. This should be well drained. Commercial potting soil is recommended for cultivation in pots. It is particularly important that there is no waterlogging. It is advisable to loosen the soil carefully before planting in order to give the tayberry optimal conditions.
Planting Tayberry": Instructions
The tayberry can be planted all year round as long as there is no frost. Autumn is the best time to plant the Scottish berry.
Before you plant the Tayberry, you should water the root ball well. To do this, place the plant in a bucket of water so that the root ball can soak up water. A sufficiently large planting hole should be dug for the plant. As a rule of thumb, the hole should be at least twice the size of the root ball. Next, you should loosen the soil in the hole. If the soil is very heavy - such as loam or clay - adding sand or gravel can help loosen the substrate sufficiently. The excavated soil should also be loosened and enriched with compost. Then place the plant in the hole and completely cover the root ball with the excavated soil. You should now water the shrub thoroughly - this will also settle the loose, filled soil. Compacting the earth by trampling is not necessary. After planting, the shoots of the tayberry should be cut back to about 40 cm in length. This will ensure that the new shoot grows close to the groundand is as bushy and dense as possible.

Here are the step-by-step instructions for planting the tayberry:
- Dig planting hole
- Loosen the soil in the planting hole
- Loosen the excavated soil and enrich it with compost
- Put the tayberry plant in the hole
- Cover root ball completely with excavation
- Water the bush thoroughly
- Pruning back shoots to a length of 40 cm
If planting several tayberry bushes in a row, leave at least 2 meters between each plant and at least 2.5 meters between rows.
Tayberry on trellis
Like the two original species - blackberry and raspberry - from which the tayberry emerged, it is best to plant it on a trellis, i.e. in a trellis. There, the shrubs grow in a controlled and upright manner, and harvesting and caring for the plant is also easier.
For the trellis, insert two meter high stakes into the ground between the tayberry plants. Three to four wires are stretched between these rods. The first wire should be drawn at a height of about 60 cm, the other wires at a distance of 50 cm.
From the plant, five to seven bottom shoots are now tied vertically to the wire. The remaining shoots are removed.

As an alternative to a free-standing trellis, the tayberry bushes can also be planted on a sunlit house wall or a hedge in a trellis. Make sure, however, that enough air can circulate between the plants and the house wall. If you don't want to build a trellis yourself, you can buy one ready-made in any larger garden center.
Propagate Tayberry
Tayberries do not propagate via root suckers like raspberries do. So you don't have to worry about uncontrolled growth. However, this also means that you have to take care of the propagation of the tayberry yourself. There are two methods of propagating Tayberries: propagation by cuttings or by cuttings.
Propagating Tayberries: Cuttings
To propagate tayberries from cuttings, simply cut out approximately 20 cm long pieces from the annual shoots in late summer. Then bury them in moist, humus-rich soil.You should remove the leaves first. The tayberry cuttings should be almost completely covered with soil and only protrude 2 to 3 cm from the soil. By next spring, the cutting should have developed its own roots and grow into an independent tayberry plant.

Propagating Tayberries: Lowering
A second way to propagate tayberries is by layering. For this purpose, a shoot tip of the tayberry bush is bent towards the ground in spring or late autumn. The shoot is then buried in one spot in the ground and, if necessary, secured with a wire. However, the tip of the shoot should still look out of the ground. When roots have formed in autumn or spring, you can separate the layering plant from the mother plant. You can now dig up the shoot and plant it in a new spot.
Care for Tayberry
Tayberries are not very demanding when it comes to care. They are fast-growing and like to take up a lot of space. So that the tayberries don't get out of hand in your garden and develop into a real nuisance, you should keep them in check with targeted care measures. We will give you tips on watering, fertilizing and cutting the tayberry properly.
Water Tayberry
The tayberry prefers neither too dry nor too humid when it comes to humidity. With a little sensitivity and regular checks, the tayberry can still be optimally watered. In the first year after planting, the tayberry should be watered once or twice a week, depending on the soil and weather. It is important - both with the young plant and later - to avoid waterlogging. Because waterlogging leads to rotting of the roots and thus damages the plant. Water a lot in hot summer, less in spring and autumn. The berry needs the most water before fruiting.

Tip: To keep the moisture in the soil longer, you can apply a layer of green clippings, leaves or bark mulch.
Fertilize Tayberry
Tayberries are happy to be fertilized in spring and late summer after harvest. It is particularly important to provide the tayberry with sufficient potassium. A primarily organic long-term fertilizer is ideal as fertilizer, which slowly and evenly distributes the nutrients to the plantgives. In addition, a primarily organic fertilizer improves soil fertility and increases its water storage capacity. Another advantage: the fertilizer ensures a better soil structure and also promotes soil life. All this contributes to an optimal supply of nutrients and good he alth of your plant. Our Plantura organic tomato fertilizer is such a primarily organic organic fertilizer, which is also ideal for the tayberry due to its high potassium content.
Cutting Tayberry
When cutting the tayberry, don't be squeamish, lest it literally grow over your head. The first pruning measures are to be carried out in the spring. Every year new shoots emerge from the base of the bush, which should be cut back radically. Only the most vital five to six shoots are left standing. All other shoots should be cut off at ground level.

In summer the lateral shoots are shortened to two buds. These shoots will bear fruit next year. To ensure that they grow in a controlled manner, you should attach them to the trellis. In addition, shoots that are too long and grow beyond the trellis should be shortened.
After harvest, cut off all shoots that have borne fruit that year, close to the ground.
Note: The tayberry develops its fruit on annual shoots. That means you have to wait a year after pruning before you can start harvesting.
Tayberry: Common Diseases
Tayberries are hardy and rarely attacked by diseases or pests. However, it cannot be ruled out that in rare cases typical raspberry diseases - such as the raspberry beetle - will appear on tayberries. Because they are planted in trellises, the berries are not easy prey for birds and are usually spared from feathered predators.
Tayberry: taste and recipes
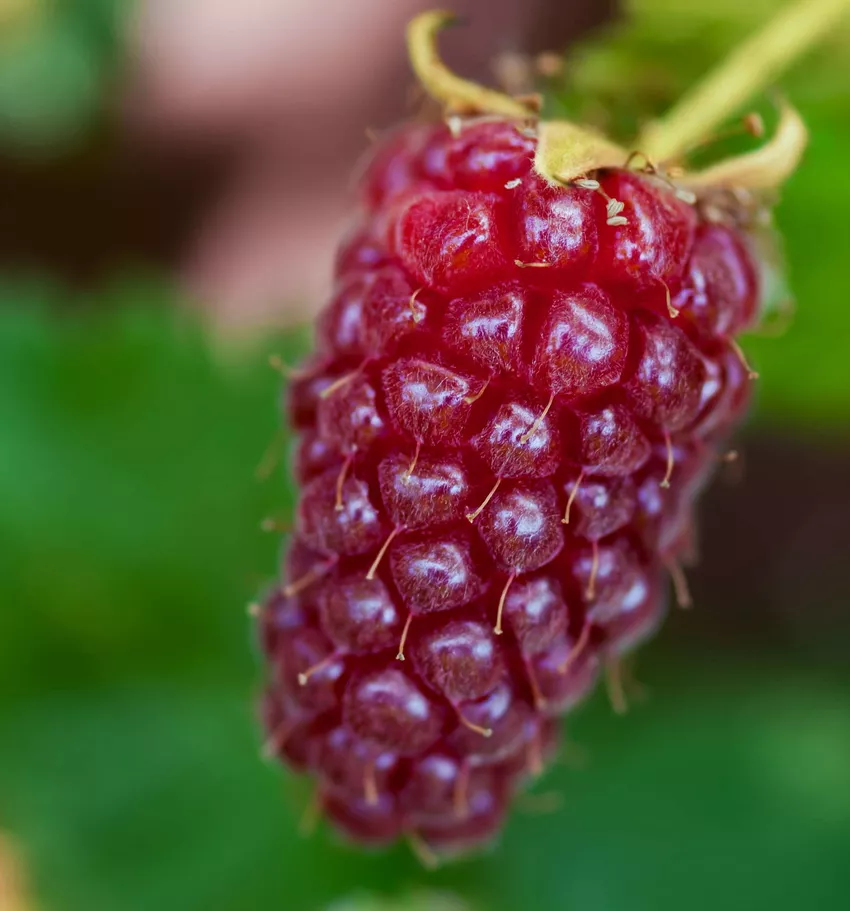
From July, the tayberries begin to turn an enticingly red color and ripen. But only when the berries have turned a dark red color are they really ripe and ready for harvest. Tayberries are slightly more tart than raspberries, but just as rich in valuable vitamin C and antioxidants.

Fresh tayberries taste great with whipped cream or Greek yoghurt. Also for baking as a crumble or as a cake fillingTayberries are well suited. And of course you can also make delicious jam from the berries. Unfortunately, the berries only keep in the fridge for a day or two, but they freeze very well.
Here's an easy tayberry crumble recipe:
Ingredients for the crumble:
- 100 g wheat flour
- 80 g sugar
- 1 packet of vanilla sugar
- 60 g butter
- A pinch of s alt
Ingredients for the filling:
- 250 g tayberries
- 50 g sugar
- Juice of half a lemon
Preparation:
Preheat the oven to 200°C. Mix the tayberries with the sugar and lemon juice. For the crumbles, place the flour, sugar, vanilla sugar, butter and s alt in a bowl and blend into small crumbles. Spread the tayberries in a casserole dish and sprinkle the crumbles over them. Bake the crumble in the oven for about 25 minutes until the crumbles are golden and crispy. Then serve with powdered sugar or whipped cream.

If you are also interested in other special berries, check out our article on the best berry varieties for your garden here.