
The chervil beet is a native but almost forgotten type of vegetable. We present the aromatic tuber and give tips on growing chervil beets.

A little-known root vegetable is the chervil (Chaerophyllum bulbosum), which is prepared as a delicacy because of its rarity and very special taste. In this article you will learn everything about chervil and growing it in your own garden.
Turtle: origin and properties
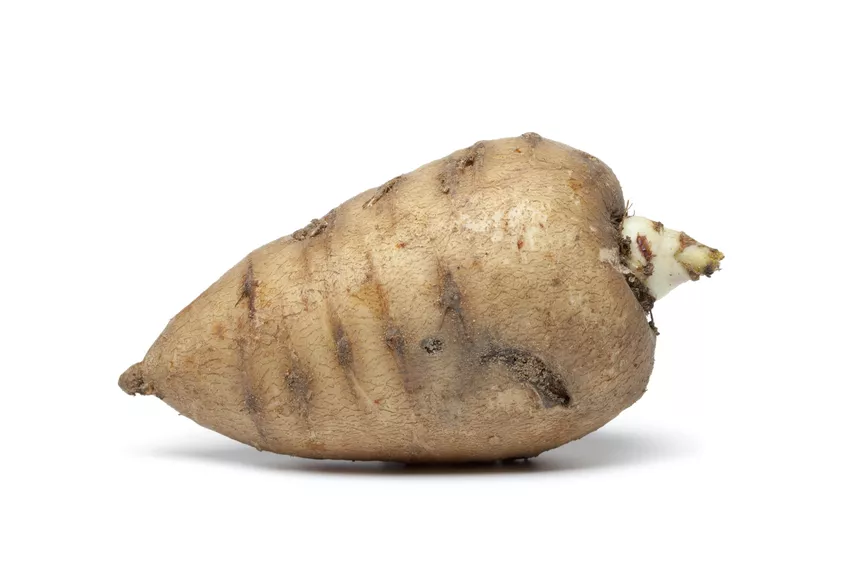
The chervil is a vegetable that has almost been forgotten today and is also known under the names tuber chervil, nappen carrot or tuberous calf's crop. In English they are known as turnip-rooted chervil, in France as cerfeuil tubereux. The tuber chervil was first mentioned in writing in 1601. At that time it was already being offered at the Viennese vegetable markets. The chervil belongs to the umbelliferae (Apiaceae), like the parsnip (Pastinaca sativa) and the carrot (Daucus carota ). It is native to Central Europe, but there is also a Siberian chervil that has a yellow skin. The wild chervil also occurs scattered on damp meadows in Germany and Austria. Our local vegetable chervil develops up to ten centimeters long, blunt and thickened roots, which are light brown on the outside and whitish-yellow on the inside. The foliage is delicately pinnate and strongly reminiscent of carrot leaves. The taste of raw chervil is parsnip-like, crunchy and juicy. But it only unfolds its unique, strong taste of chestnuts when it is cooked, which makes lovers' hearts beat faster.
Growing chervil
Cultivation of chervil beet is not easy, which is why it is not grown commercially. It has been preserved in crop associations and in home gardens as a hobby vegetable. The chervil beet is a frost germinator, which means that it is sown in autumn and, thanks to the cold winter, germinates the following spring. Between August and October, the seeds are sown directly into the bed, with a row spacing of 20 centimetres. Unfortunately, germination is oftennot particularly high, which is why it is better to sow densely than you would do with carrots, for example.
Caring for chervil
Care for chervil beets is the same as for parsnips, carrots, etc. In spring, the soil must always be well supplied with water during and after germination, because the beets cannot stand drought and otherwise hardly thrive. After germination in spring, the seedlings are separated to 3 to 5 centimeters. The thick roots of the medium-consuming chervil beet mainly absorb nitrogen and potassium from the soil. Fertilizing with a predominantly organic long-term fertilizer, such as our Plantura organic tomato fertilizer, replenishes the soil's supply of nutrients and protects soil life. The plant-based granules are lightly worked into the soil around the crop and kept moist. The nutrients contained are then released evenly over a period of two months and provide the bulbous calf's head with all the essential minerals. Unfortunately, the chervil has little competition from other plants and must therefore be regularly cleared of weeds.
Proliferation of tuberous calf goiter
If you want to propagate the chervil beet yourself, you have to overwinter the plant twice: once as a seed in the ground and the following year as a root. Because just like most umbellifers, it is a biennial plant that, true to its name, only flowers in the second year of life, produces seeds and finally dies. In spring, the biennial chervil beets quickly develop elongated flowering shoots, at the top of which there is an umbellate waiting for eager pollinators. For propagation, it is essential to have several flowering chervil beets next to each other, so that many seeds can be harvested later. The now brown, slightly curved seeds are ready for harvest in late summer. To do this, it is best to cut off the entire umbel and let it dry thoroughly until the seeds can be easily detached. Ideally, you sow again immediately after the seed harvest, because the seeds of the chervil quickly lose their ability to germinate and should soon be underground again. If the seeds are very well dried, the ability to germinate can be extended by freezing.

Harvesting and use of chervil beet
The turnips are harvested in July as soon as the foliage has completely yellowed. You can also leave the roots in the ground until autumn, but mice also love the unique taste of chervil and like to beat themgenerous to. In the cellar, the harvested turnips without leaves are wrapped in wet sand and stored for about two months. Only in this way does the chervil beet achieve its full aromatic taste. The bulbous calf's head is ideal peeled for soups and mixed with potatoes for a tasty puree. The fine chestnut aroma also unfolds very well in risottos and casseroles.
Do you also ask yourself every year where which type of vegetable should be placed in the garden and who gets along well with which neighbor at which location? A vegetable growing plan can help with all of these questions. We'll show you how to do it without any problems.